


I got in touch with Ted, the guy Steve recommended, last night and we chatted about the bike. He told me to call him back on Monday as he was currently working on 2 or 3 bikes and by Monday he should be wrapping up those projects. He told me that he would drop by to look at the bike and see if it's a project he would like to take on. He would also be able to pick up the bike, which is a plus!
More to come next week.
Archive for 2010
Ted!
Work...
So school has consumed my life. I have been pretty busy planning and this has left me little/no time to work on the bike.
What has occurred since I last posted (over a month ago)?
- FINALLY got the exhaust on and it looks pretty awesome.
- Got the entire bike back together and threw some gas into the gas tank.
This is where it ends. Why? Well I can't get it started and I don't have the tools required to do it. On top of this, fuel is leaking out of one of the carbs into the air filter. Awesome. It probably has something to do with the float being stuck but I haven't had the time to look into this.
I have decided to seek professional help to get it running. I made a call to 679 Bike (where I purchased my tires) about getting it up and running. Steve, the owner, told me that they are not able to take on this project right now BUT he knows a guy who specializes on older bikes. He does this a side business and, therefore, his rates will be lower (yay!). I'll be calling him later today. Hopefully I will be able to drop the bike off this Saturday as the weather will be nice and my dad can get a trailer to transport it.
Stay tuned for updates....I swear!
Delay...
I had some ups and downs since my last post.
- LOTS of problems with getting my exhaust on but I THINK it is pretty much sorted out. I haven't attached it yet mainly because it has been incredibly hot out.
- Reattached the carbs and air filter box (huge pain).
- STILL waiting on the two parts...
- My starter works! Tried it two days ago and it sounds great.
I need to pick up another in line fuel filter (I only ordered one...duh), some gas and then I'll reattach the gas tank and fuel lines.
I am getting pretty excited to try to start this bike!
Happy! And Annoyed!
My exhaust came today!
I took a picture but i'm too lazy to get the camera and transfer it to the computer. Plus, it will look better when it is actually on the bike.
Here is the journey it took:

I have no idea what was going on with Windsor but at least it got here!
Anyways, turns out I really should have removed the stock flanges on the engine earlier because they need to come off and they are turning out to be a PAIN to remove. I successfully removed one of the 8 screws the old fashioned way. The rest turn out to be so seized (I smashed them repeatedly with an impact driver) that I need to drill them out. This is the point I'm stuck at. I'm pretty sure I spent more than 2 hours wrestling with them today and I'm still not done.
Tomorrow I will complete this (dammit!), clean the engine and then attach the exhaust header. I should also install the carbs and air filter box. I'll try to clean up the fuel tank as well...more on that tomorrow...hopefully.
Things I Did Yesterday...
- tightened some bolts and got the driver's footpegs on.
- hooked up the clutch cable and replaced the cover.
- hooked up the tachometer and speedometer cables.
- properly attached the rear brake and the rear brake pedal.
- reattached the oil tank and oil hoses (this was a huge pain).
- reattached the kickstarter and gearshift pedal.
- replaced the headlight fuse (there were extras in the fuse box cover!) and verified that all of the lights work!
- installed the drive chain.
I still need to get the top bolts on the forks but I need a GOOD jack to do this. My little one for the car just won't cut it. I also need to get at the oil pump and clean out the screen and just check out the condition. Carbs need to be reinstalled along with the air filter.
These are just a few of the things left to do before I can try to turn over the engine.
My exhaust is in Windsor right now waiting to go through customs!
A Family Affair
Earlier today I got the brake caliper back together (with the new brake pads), attached it to the left fork and mounted the front wheel.
Earlier in the evening I had a whole bunch of help putting the engine back in. These pictures will help explain...


Many of the bolts holding the engine to the frame have been tightened. The heavy stuff is almost done. Getting really close now...
Edit: I forgot to mention. My exhaust has been shipped! It is coming in from Chula Vista, California. Excitement!
Minor Setbacks
Well there was some setbacks BUT the engine is ready to be put back into the frame. Hopefully this will be done tomorrow evening when I have some helpers over (i.e. my brothers and my dad).
However, I still need to get the front wheel on. I got the forks off, replaced the seals and got them back on (this was a huge pain). Hopefully the front wheel (along with the brake caliper) will be on before they get here.
I also got the back wheel back on. Easiest job so far!
This seemed like it would be a longer post...I guess it's because I didn't elaborate on the setbacks. One of them made me feel sick to my stomach. I honestly thought I broke something REALLY important. It was awful. Turns out it was something minor and the part is on order.
Full Steam Ahead
FINALLY!
Piston rings came in today along with the rear brake pads I ordered and the fork seals.
I started to put the engine back together and I got pretty far into it. I am tired and therefore I will take pictures tomorrow.
Also, my tires came in. I dropped off the wheels and they should be ready tomorrow.
The (seemingly) Endless Wait for Parts
Still waiting for my piston rings to come in...maybe tomorrow?! Ugh. Until then, I can't start rebuilding the engine. I also can't complete the engine build until I get a new bolt for my cam sprocket (I stripped it pretty bad trying to remove it) which is on order from Dewildt Honda (amongst other odds and ends I need).
Made a big order into Bike Bandit on the 12th. Awesome right? Not so much. Two of the four items are on back order and they won't let me know how long it will take as the manufacturer didn't give them a time frame. I wasn't aware of this until FOUR days after ordering. Also, the BIG item (exhaust pipes) are being cross shipped (??) and will be delayed. So really the only item that should be sent in a timely fashion is an air filter...which I can't do anything with until everything else comes in.
Venting complete.
On a more positive note, my tires should be in on Wednesday. However, Paul informed me that the owner has a habit of forgetting to put in tire orders. This should be fun!
A light at the end of the tunnel?
I am trying to get as much done on this bike before the summer ends. My goal is to get the engine back into the bike by next week. What has happened since my last post? Well I sent in my valve head to Head and Block to get reconditioned. It looks amazing!


This was a necessary job as I don't have the tools or knowledge to do what needed to be done. I am still waiting on my piston rings (they should be in today or tomorrow I think as they were sent out on Monday) but I did get the pistons back in the engine last night.

I got in contact with a local bike shop (679 Bike) about getting new tires put on. I need to call them back and get the tires ordered. I also drained the forks and began the process of removing them. The seals definitely need to be replaced.
The fuel tank needs some attention so I began dealing with that. Opened the tank and found, not surprisingly, that the rubber o-ring is badly degraded. The tank still had some gas in it and man did it stink. I rinsed that out as best as I could in preparation for the rust converting liquid I picked up in Buffalo (by the way, the chemical reaction that occurs is pretty cool and I'm definitely going to be using it as an example of a double displacement reaction in my grade 10 science classes this year). I decided to take apart the petcock as well as there are a couple of o rings in there that will most likely be toast. As I attempted to disconnect the bowl the wrench tore the bottom out.

I order about 5 more replacement parts from Honda and I just put in a big order into Bike Bandit for a new exhaust system plus a couple other parts I need (drive chain, fork seals, air filter). I am off to purchase some fuel line and hose clamps.
More Parts!
I got some parts. Behold.

gasket set for the engine
bag o bolts (engine)
in-line fuel filter
master cylinder rebuild kit
brake pads
headlight
brake lever
2 pistons
What I didn't get? Piston rings. I can't put the pistons in and thus begin rebuilding the engine without them. Argh. They are out of stock and will send them when they are in. Ah well...other stuff to be done.
While I was waiting for the above parts to be delivered I continued cleaning the bike of dirt and grease. I also continued stripping as much rust as possible. Slow going but progress is being made.
I did rebuild the master cylinder yesterday. It was a bit of a pain but very rewarding when I finally got it. Put it back on the bike along with the new brake lever. It looks quite shiny especially compared to the old clutch lever.
I did a little bit of cleaning on the engine (removing the last vestiges of gaskets) and replaced a couple smaller gaskets.
While I was in Buffalo I also picked up a valve spring compressor (amongst a couple other items...self etching primer, flat black paint and a solution to help rid the fuel tank of rust) which I will put to use soon to make sure the valves are running properly. I guess I need to do this before I rebuild the engine. Probably for the best the piston rings aren't in yet.
Good News!
Turns out the cylinder block only had to be honed! Boring the cylinders COULD (although I doubt they would have charged me this much) have cost upwards of $90...per cylinder. The grand total to get it honed? $33.90. Nice. Also, this means that I don't need to buy 4 new oversized pistons ($199 USD). Instead I cleaned up the old ones (good thing I didn't toss them, eh?) except for #2 (which has a stuck ring and is therefore toast) and inspected them. 3 and 4 are in great condition. #1, however, has enough damage that I need to order not 1 but 2 new pistons.
I ordered a gasket set for the engine, new bolts for the engine (old ones are either rusted, fairly stripped or totally ruined), one new piston [need to order another...damn my lack of patience], and 4 sets of piston rings.
I don't have any pictures right now. Boo.
Boring
This past Friday I worked on the bike for the better part of the day. It was incredibly humid out (it felt like I was working in a rainforest) but I did as much as I could.
I removed all 22 of the nuts and bolts holding the cylinder head on and finally removed it. the block came off fairly easily but the pistons were stuck in there pretty good. A little wiggling and they were free. I then removed the pistons and removed the oil rings.

Looking back now this was a waste of my time as you will see in a little bit.
Next, I cleaned up the block as best I could. I sprayed it with engine cleaner, let it sit for 10 minutes and then sprayed it down with the hose. I then scraped and sanded off what was left of the gasket.
I knew that the cylinders would need to be either honed or bored and judging by the amount of rust and some advice from people with more knowledge than I, boring seemed to be the only way to go. Finding a shop to bore out a block is more difficult then it seems. Long story short, it happens that Allison's grandfather used to work for a place that does this sort of work and he decided to share this information with me yesterday. Sometimes things have a way of working out, don't they? Head and Block hopefully will call today and let me know how much they had to bore out the cylinders. I can then order the appropriate over-sized pistons (hence why my previous work was a waste of time) and some other parts that I need to put the engine back together.
Oh. I also started reassembling the carb assembly and removed, disassembled and started cleaning the forth carb (I left this until the end so I remembered how the other three were to be assembled). I'll also need to order some new fuel line tubing as they are starting to get quite fragile after 30+ years.
Here is a picture of the engine and the cylinder head which I'll need to clean the crap out of.

Oh So Close...
So with the engine out I ran into more difficulties. It seems like the difficulties come with REALLY seized bolts/screws. Who knew that almost 30 years of inactivity would cause so many problems?
I had all of the screws loosened on the head of the engine except for two. Turns out (after looking on the SOHC4 forum) that those two are the most difficult to remove as they tend to get very corroded. Mine were no exception. They are awful. Definitely need new ones. Especially since I had to drill the head off both and had to drill out one entirely. This process took entirely too long and was somewhat stressful at time but long story short, I got them out and the head came off.
This is what was underneath.


The past couple of days/nights I have been loosening and remove rocker arms, cam shafts, etc. etc. It is kind of a jumble of bolts, screws, rods and chains. So much so that I need to be crazy organized which is right up my alley!

A lot of nuts and their respective positions.

This is what the engine looks like right now.

I am very close to removing the cylinder head cover. One more screw needs to be loosened and I certainly can't start wailing at it with an impact driver at 11pm so it will have to wait for tomorrow. Once that is loosened I can lift the head up and get a look at the pistons.
Success!
A lot of progress within the last couple of days.
1) That bolt that was seized? Picked up my father-in-law's dremel and chopped the head off of it.
2) Got the rest of the wires and bolts that held the engine to the frame free.
3) Removed the back tire.
4) Struggled like hell with the chain only to end up cutting it off the bike with the dremel.
Finally...
5) Removed the engine! Woot! With the help of my dad. See the proof below.


Next step: Get the head off the engine and start dismantling it to get at the seized pistons.
Hitting some snags
I haven't taken the engine out yet because I've come across some difficulties.
1. One of the bolts holding the engine to the frame does NOT want to come out. Specifically, the nut doesn't want to turn on the bolt...probably because it is rusted/seized. My dad came over and tried to help as well but to no avail. What can I do? Well, I am going to drill into the head of the bolt to weaken it and then grind it down so I can punch it through. This will take some time and I will have to get a new bolt (luckily they should be relatively cheap through Honda)
2. I need to remove the drive chain BUT it does not have a master link which means I cannot break the chain without permanently breaking it (read: I would need a new chain). My dad is confident that the chain is in really good condition so yet another reason not to break it and drop $70+. So my only recourse is to remove the rear wheel. This, like the bolt, will take time.
IF the engine works, then all of this is worth it. If not...well, then it's not. I have to keep telling myself the engine will work, the engine will work.
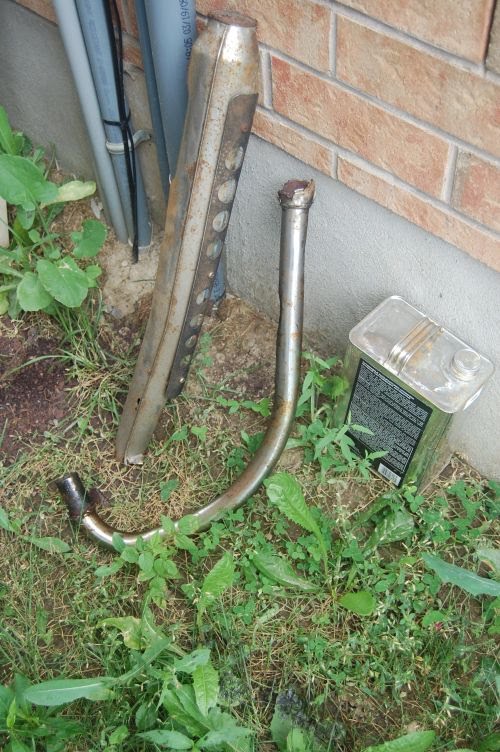
Really gross exhaust pipes.
Today I began removing the exhaust pipes. I started at them with brute force...didn't really work. So i realized that I had to remove a couple large bolts which held the pipes in place and that made removal much easier. When I started to rotate the left exhaust pipe (needed to remove it) it split in half and rust poured onto the floor. Nice. The picture below shows the left exhaust pipe in two pieces...with a pile of rust nearby.

(Some) Success
All spark plugs are now out. The fourth and final one was a PAIN to get out but with some patience, penetrating oil and a johnson bar with a 1 in, 18 mm socket, I prevailed.
Now that the spark plugs are out I was able to get some lubricating fluids into each cylinder. I found a post on a forum I now follow (sohc4.net) that said a 1:1 ratio of transmission fluid and acetone works the best for unseizing engines. One bottle of nail polish remover (thanks Allison!) and an equal part ATF and I was good to go. I've heard that this process can take as little as a few hours (not in my case) or up to 1-2 weeks. I'm guessing more towards the latter end of this scale...We shall see.
One final thing to note. I went to my parents' tonight to help both my Dad and my Mom with 'computer troubles' (I am their pro bono tech guy. woot.) when my Dad hands me the registration papers for the bike! So cool! If (when!) I get this bike running it would be a lot more difficult to get it on the road without these papers. I'm so glad he kept them.
I Got Parts!
We got back home around 4pm from Peacock Point and what was waiting for me at the door? My parts! Wow! Now that was fast.

I didn't get much time last night to work on the bike as I was (a) tired and (b) being eaten alive by mosquitos. However, I did get one the clamps that secure the exhaust pipes to the engine loose but the rest were pretty seized. Sprayed them with penetrating oil and moved on. Got the clutch cover removed (it came off easy enough). Removed the kickstarter, as well.
Three of the four carbs have now been cleaned! I kept one intact just in case I forget how they go together and the books I have somehow fail me. I also came to the realization that I may have lost the float pin (a pin that holds the carb floats in the bowl). It is tiny and I may have lost it. Damn. I have, however, found someone on eBay who sells replacements at a reasonable price but I will hold off for now.
Carbs
I have FINALLY removed the carburator assembly. It seemed to take forever due to very stiff connections between the carbs and engine AND the incredible humidity. Here is the bike sans carburator.


Last night I ordered a few things from VintageCB750.com (out of Stratford, ON) to help get this bike running:
- 4 carb rebuild kits
- 4 spark plugs
- 1 battery
My next goal is to start soaking another carb, clean this current one in preparation for the rebuild kits and pour some transmission fluid into the spark plug holes of the engine so I can get this engine unseized.
Slow Start
Today is my last exam day. Once I mark (they are writing as I type this), record, make comments and submit I am pretty much done for the year. I still need to do some other menial tasks but I am effectively done. Starting next week I can work full force on the bike. Exciting!
However, I have done a few (small) tasks on the bike. In no particular order:
- Removed the seat (wow!)
- Gas tank was previously removed by Paul.
- Removed the back rest (once again, wow).
- Removed the license plate and alarm system* it was attached to. (my Dad took both as a souvenir)
*The alarm system, so says my Dad, was set off when the bike was tipped too much in either direction. Fairly simple. I opened it up to find a LONG corroded 9 volt and two small vials filled with mercury. When the liquid mercury moved too far to the left or right it touched the contacts which set off the two alarms.
- Drained the oil! (this was difficult as I only had short wrenches the bolts were seized. A visit to Paul and I picked up the needed tools: metric sockets and a johnson bar [Truth be told, I thought he was kidding me with the name]. I barely had to put pressure on this bar in order to loosen the bolts.)
- Started to disconnect the carburator.
I have picture of the oil disposal process (i.e. pouring the oil from crappy, dollar store salad bowls [the dye on the bowls actually stained Allison's shirt! Quality craftsmanship] into an empty detergent container.) which I'll post later.
I'm hoping to work on it a little bit more before I go camping with the guys this weekend. We'll see...
P.S. I found the HUGE (~300 page) CB750 shop manual on the Internets and printed it off in one of the school's computer labs (shhhhh...don't tell admin :s).

It Begins
For as long as I can remember there was a motorcycle in the shed in my parent's backyard. I was fascinated with it. I remember wanting to sit on it and ride it. I'm pretty sure I did get to sit on it...my memory is a little fuzzy about that. However, I do remember that it sat there, untouched, day after day, year after year until last year when my brother (Paul) pulled it out of the shed and into my parents' garage.
The motorcycle is a 1973 Honda CB750K3. This bike took my Dad to the West and East coasts of Canada and back. I know that he also used it to commute to university (notice the yellow sticker near the rear light?). The license plate states that the last year this bike was legal to drive was 1981; the year after I was born. There was nothing wrong with the bike when he stopped riding it. It sat around for a little while (my Dad is not quite sure how long) since my Mom and him were kept busy taking care of me. He never got around to riding it and, because of this, the engine seized.
I think he wanted to fix it up eventually...but life just sort of got in the way. So it sat in the shed for years. Until now.


I have made it my summer (most likely longer) project this year to get it working. What you should know about me, and if you KNOW me already than this will come as no surprise, I have absolutely no mechanical knowledge or skills of any kind. However, I am going to try my hardest to learn and figure this stuff out. I like a challenge! I also have many people in my life who said they are willing to help in any way they can.
I have decided to document this for friends, family and for myself.
Wish me luck!